KÜPE TASARIMLARI etiketine sahip kayıtlar gösteriliyor. Tüm kayıtları göster

5 Haziran 2014 Perşembe

Bronz ve Kristal Küpe Örnekleri


Earrings:  Silver and Lampwork


Earrings:  Silver and Crysal


Earrings:  Silver and Lampwork


Earrings:  Bronze and Crystal

Yılbaşına Özel Takı Tasarımları - Kardan Adamlı Küpe Tasarımı

Getting Ready For Christmas Sales

It seems a bit weird making Christmas Jewelry in September, but that's the nature of art and craft fairs and festivals.  I personally start to shop for my Christmas gifts and decorations early.  It helps with the budget and of course to help reduce the stress of last minute shopping and the search for the perfect gift.  So I have begun.  There is a lot more that needs to be made.  I'm waiting on a delivery with silver wire so there will definitely be more designs, not only earrings, but bracelets and pendants.  In the meantime here's some eye candy for the Christmas season.


Copper, antiqued and crystal

Bronze with crystal


Bronze with lampwork

Bronze with lampwork and crystal

Bronze with lampwork and crystal

Bronze with lampwork and crystal

Bronze with lampwork and crystal

Tel Küpe Örnekleri - Farklı Bir Küpe Örneği

Twisted Wire Earrings

Here are five new earring listings now in my on line shop.  As much as I absolutely love these I must admit they require a lot of time to make.  First I doubled up some wire and twisted it.  Then the twisted wire went around a mandrel.  Time in a bath of liver of sulphur, but more time removing the excess, etc.


These copper earrings are 2 5/8" long and are listed for $20 in my on line shop


These earrings are 2 5/8" long with Swarovski dangles are listed for $20 in my on line shop


My all time favorite stone is the Crazy Lace Agate.  These can be found in my on line shop for $20

I'm always fascinated how a different stone or crystal can have such a large design impact.


Clear Swarovski crystals are like diamonds and go with everything!  They are in my on line shop for $20


These have some extra Swarovski bling with Capri Blue crystals.  They can be found here for $20

Tasarım Küpe Örnekleri

Earring Frenzie

I'll keep this blog post short on words, but long on pictures of earrings.  I need to get ready for Santa Claus.

Copper and Riverstone
Copper and Tiger Eye
Copper and Seed Beads
Silver Filled and Crystal
Copper and Riverstone
Copper
Copper and Crystal
Copper, Resin and Crystal
  Copper and Seed Beads
Copper and Crystal
Silver Filled and Crazy Lace Agate

Güneş Şeklinde Küpe Tasarımı - El Yapımı Küpe

Earring Tutorial - Sunny Spiral


Here's a tutorial for my most recent earring.  Enjoy!

Materials needed:
20 gauge or 18 gauge (I used silver plate by Para wire)
A pair of ear wires

I used 20 gauge for the spiral portion of the earring, but in the future I believe I will use 18 gauge to give it a bit more strength.  Al tho, I believe the 20 gauge is perfectly fine.

Tools needed:
Flush cutters
Small round nose pliers
Chain nose pliers
Tube wringer
Sharpie pen
Ruler
Hammer
Steel block


Measure and flush cut a 7" piece of wire.

With your Sharpie pen, measure and make a mark at 1/2" from the end and another mark at 3" from the end. (or 2 1/2 " from your first mark.

The balance of the wire will measure 4"


Get your handy dandy tube-wringer ready.  This tool is usually found in the art paint department of your local hobby store.  Mine has been collecting dust, along with my paint supplies.


Insert your wire at the 1/2" Sharpie mark.  This 1/2" of wire needs to remain straight.  Later this will make the loop for hanging.

Here's where you may need to practice.  The pressure you use to squeeze the tube wringer onto the wire can't be too hard or you will break your wire.  If the pressure is too gentle, you won't get a good crimp.


Turn the crank on the tube wringer and allow the wire to feed between the teeth of the tube wringer.  This will give the wire an even zig zag bend.  Continue to crank up to the 2nd Sharpie mark.   You will then have 2 1/2' of zig zag.


Remove the wire from the tube wringer and use the tip of your small round nose pliers to make a small loop on the straight end.


Your wire will now look like this.  1/2" of straight wire, 2 1/2" of zig zag wire and 4" of straight wire with a small loop on the end.


Starting at the small loop, use your chain nose pliers to make an open spiral up to where the zig zag begins.  I try to space the open spiral so that the space in between each row of wire is about the same as the thickness of the wire.

 
Now slowly and carefully continue the spiral using the zig zag portion of the wire.  I have the points of the zig zag wire actually touch the prior row of the spiral.  the space in between each zig zag give the same spacing as the previous spiral rows. 

Do not spiral the remaining 1/2" of straight wire.


Use the middle of the mandrel on the small round nose pliers to make the top loop for hanging.  I'm sorry for the blurry picture.  Photography isn't my forte' and it was chilly outside.  I guess you're seeing my shivering.

Now gently hammer the entire spiral.  This will work harden the wire and also flattens the wire for the appearance.


Now add some sort of dangle, a bead, a crystal or a squiggle of wire (I've used 18 gauge wire for the squiggle and then hammered it to give it some weight and balance).

I hope that you've enjoyed this tutorial.  Thank you for visiting my blog.

Have a joy filled and creative day!  Linda

Küpe Nasıl Yapılır Anlatımlı Küpe Tasarımı - Adım Adım Küpe Yapımı

Earring Tutorial - Pear Filagree

I have an addiction to Pinterest.  There are so many wonderful pictures of wire jewelry to spark the imagination.  Once I find a design that calls to me I become challenged to recreate the piece, which usually comes out a wee bit different, with my spin on the design.   I followed a link on Pinterest, that lead me to Etsy, that lead me to KariLuJewelry, which is the shop name for the beautiful creations by Karissa Mohr.  I adore her designs.


So I accepted my own personal challenge, to see if I could recreate a pair of earrings that grabbed my attention.  My design has a slight variation with the shape and I think my wire gauge is smaller.  Since I really like them, I decided that I would take pictures of the process, just to document for myself.  But then, as before, I thought I would post the tutorial here on my blog, just in case someone else wanted to give them a try.

Supplies:
18 gauge wire
20 gauge wire (because the 18 gauge wouldn't fit through my gemstone beads and I didn't want to drill the holes.)

Tools:

 
My handy dandy leather sound muffler thingy, or a folded towel.  Plus my steel block, perhaps yours doesn't have as many scares in it (I really need to clean this one up).  And, a jewelry hammer.  I know, I know, your looking at this and thinking to yourself 'Isn't that a hammer from the hardware store?"  Yup!  Very high tech!  One day I'll get a jewelry hammer.  In the meantime, let's pretend the marks in my wire are intention.  My artistic licence to give pieces an organic feel. Ha!
 
 
What the heck!?  Now you will need a mandrel that measures 2.0 meters in diameter, that's 'about' 1 1//2 inches.  I used the #20 punch from my dapping set.  Because I didn't know what the #20 meant, I used my sliding millimeter gauge to measure.  Yup!  #20 means 2.0 meters.  Go figure!
 

The indispensable Sharpie and a ruler.  And, you guessed it, my favorite ruler was a freebie from years ago.  I've been hoping for a 2nd ruler to come in my order, but no such luck.

 
I used the 2nd step on my small step pliers, but you can use your sliding millimeter gauge to find the 3.5 mm area on your round nose pliers.
 

And without further ado......The team of best hand tools...starting at one o'clock, chain nose pliers, small round nose pliers, flush cutters, flat tip pliers and nylon jaw pliers for straightening wire.
 
Now to get down to business.....


Flush cut a 6" piece of 18 gauge wire.  Straighten it.  Use your Sharpie to mark the 3" center.
 
 
Use your flat nose pliers to make a sharp 90 degree angle.  This angle will help to make both of your shapes consistent.
 
 
Place the 90 degree wire on the round portion of your dapping punch or mandrel.  Hold the wire in place with you fingers against the mandrel.  You want to make sure that you do not lose that 90 degree angle.  The top bend in the wire will not touch the mandrel.  It will stick out a bit.  Now use your free hand to push the wire ends around the mandrel to form this shape. Bringing the wire straight upward adds a needed curve to the very bottom of the end wires.

 
Using the 2nd step (3.5 mm) of the small step pliers, or the spot on your round nose pliers, make outward loops on each end of the wire.


Use your chain nose pliers to form open spirals that look like the above.  There is one complete circle in the center and a half open circle.  The space is about the size of the wire diameter and the tips of the wire are now facing downward.
 
 
Place the center of the small round nose pliers at the base of your form.  You will have 2 wires in the pliers.  Make sure your pliers are centered to align with the top bend, or your form will be wonky.  Keep the pliers in place with your dominate hand and use the fingers from your other hand and grasp one of the spirals and pull it across the top of the pliers.  Now you will have this form.
 
 
Put the middle of the small round nose pliers back into the same place.  Hold the pliers to secure the wire and use your fingers from your free hand to move the other spiral over to the other side.  Now you will have this shape.
 
 
Use your fingers to gently pull the bottom part of the form slightly apart.  Here's a picture with a good mistake. I didn't line up the pliers with the center, directly under the top bend.  This put too much wire on one side.  Some magical tweaking is in store.
 
 
Now it's time to get rid of some of your pent up anger or frustration.  Use your hammer to work harden your form and to give it a nice finished look.  I'm thinking of trying to hammer the spirals a bit more next time and seeing if I like the look.  Oh, the possibilities.


Now use your fingers to gently move your shape back to where the curves will over lap each other to the size of the middle of your round nose pliers. 
 
Now take some 20 gauge wire and your favorite beads or charms and add a wrapped looped dangle to the center of this opening.
 
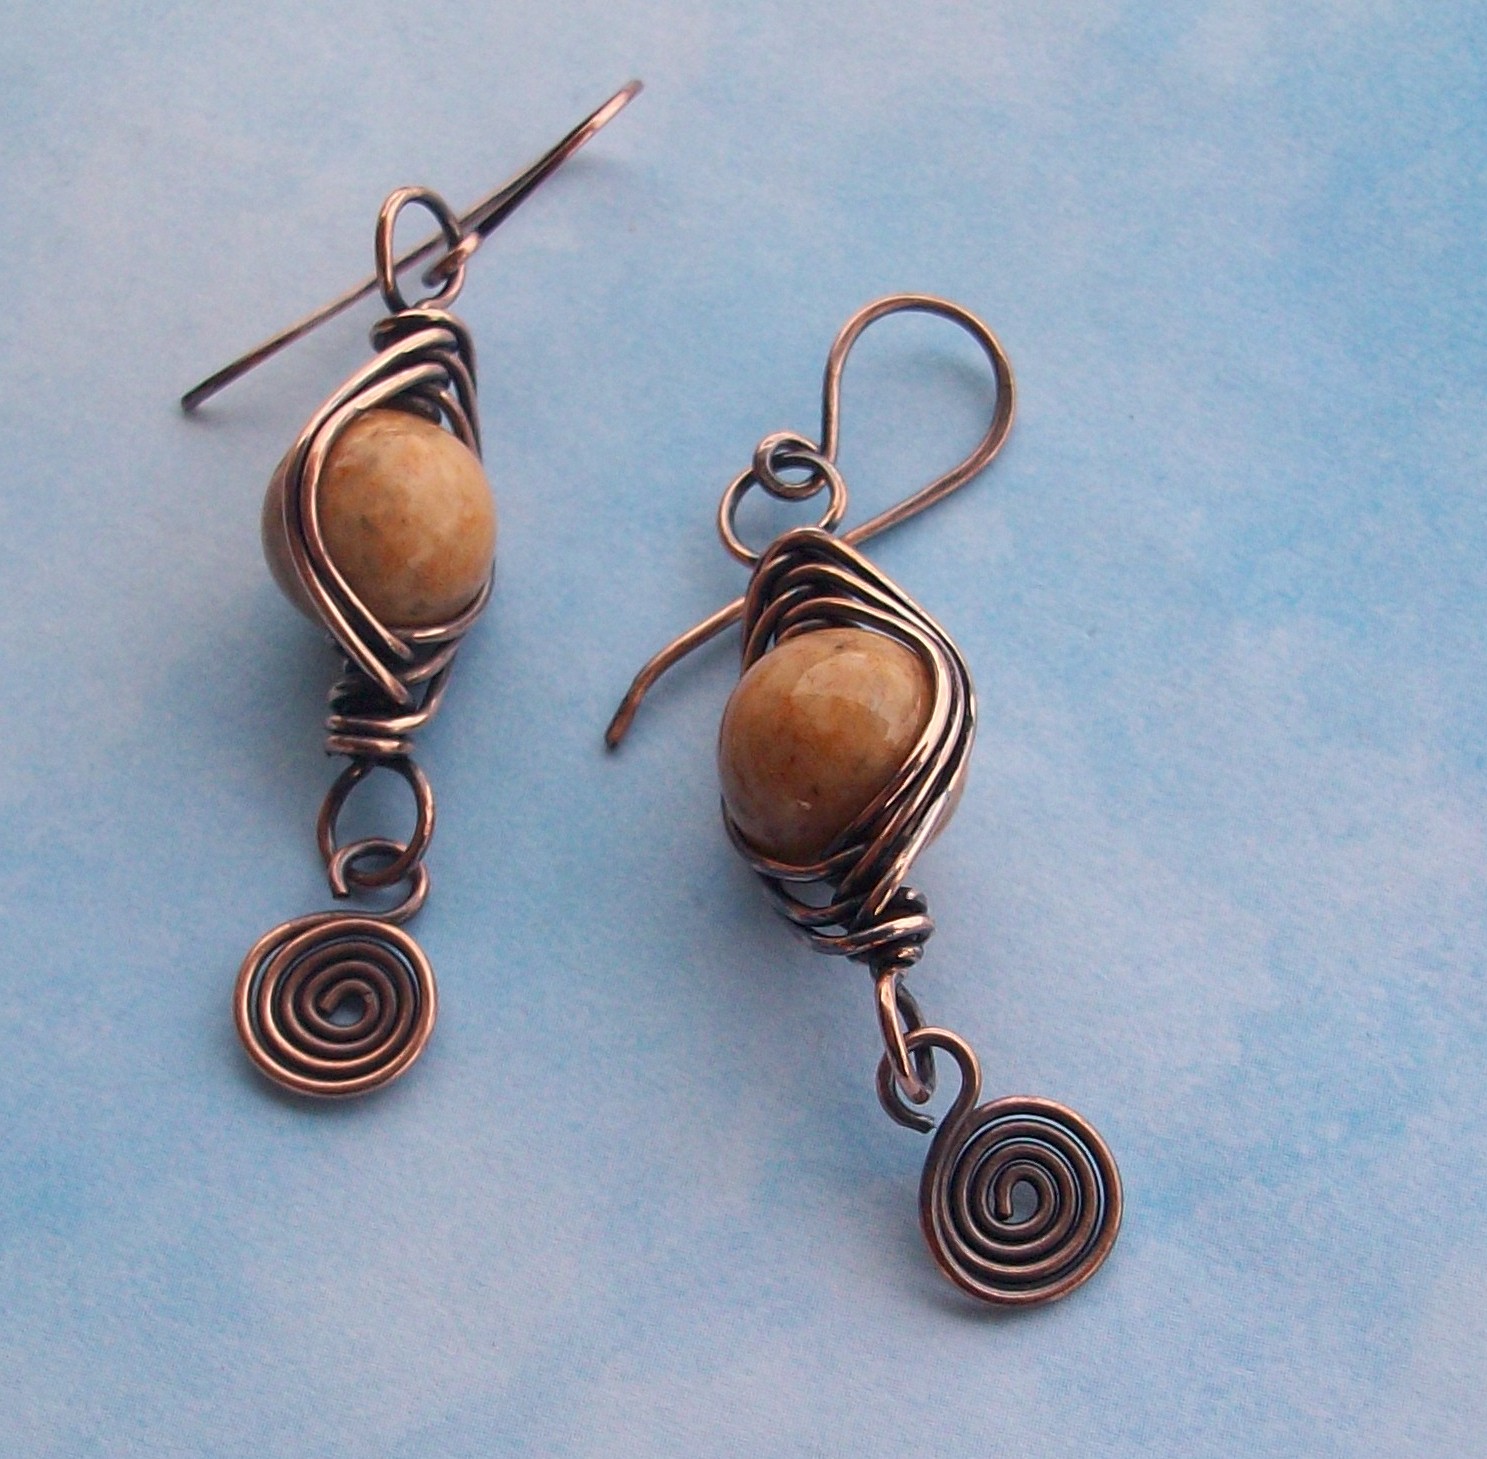
Here's another example of the final earrings.  Can you see where I made a mistake?  The earring on the left has a larger center loop.  I must have used a different spot on my small round nose pliers, or I didn't press my wire down snug to the pliers.


Now let's see if these beauties will sell for me.
 
Thank you for stopping by and reading my blog.  Have a wonderful day full of laughter and smiles. Linda